About images:
Many
different types of graphic file formats exist, but three graphic file formats
are generally used in web pages- GIF, JPEG, and PNG. Currently, GIF and JPEG
file formats are the best supported and can be viewed by most browsers.
PNG files
are best suited for almost any type of web graphic due to their flexibility and
small file size; however, the display of PNG images in sonly partially
supported in Microsoft Internet Explorer (4.0 and later browsers) and Netscape
Navigator (4.04 and later browser). So unless you are designing for a specific
target audience using a browser that supports the PNG format, use GIFs and
JPEGs for broader appeal.
GIF (Graphic Interchage Format) files use a maximum of 256 colors,
and are best for displayin noncontiguous-tone images or those with large areas
of flat colors, such as navigartion bars, buttons, icons, logos, or other
images with uniform colors and tones.
JPEG (Joint Phtopgraphic Experts Group) file format is the
superior format for photographic or continuous-tone images, because JPEG files
can contain millions of colors. As the quality of a JPEG file increases, so do the file size and the
file download time. You can often strike a good balance between the quality of
the image and the file size by compressing a JPEG file.
PNG (Portable Network Group) file format is a patent-free
replacement for GIFs that includes support for indexed-color, grayscale, and
true-color images, and alpha channel support for transparency. PNG is the native
file format of Macromedia Fireworks MX. PNG files retain all the original
layer, vector, color, and effects information (such as drop shadows), and all
elements are fully editable at all times. Files must have the.png file
extension to be recognized as PNG files by Macromedia Dreamweaver MX.
Note: PNG support in browser is inconsistent; therefore, if
you work with PNG files, you should also export them as GIFs or JPEGs to ensure
you have web-ready versions of them.
Inserting an image
When you
insert an image into a Dreameaver document, Dreamweaver automatically generates
a reference to the image file in the HTML source code. To ensure that this reference
is correct, the image file must be in the current site. If it is not in the
current site, Dreamweaver asks whether you want to copy the file into the site.
To insert an image:
1.
Place the insertin point where you want the image to
appear in the Document. Window, then do one of the following:
·
In the common category of the Insert bar, click
the Image icon.
·
Choose Insert > Image.
·
Drag an image from the Assets panel(Window >
Assets) to the desired location in the Document window; then skip to step 3.
·
Drag an image from the Site panel to the desired
location in the Document windo; then skip to step 3.
2
In the dialog box that appears, do one for the
following:
·
Choose File system to choose a graphic file.
·
Choose Data Source to choose a dynamic image
source
3. Browser
to choose the image or content source you want to insert.
If y oar working in an unsaved
document, Dreamewaver generates a file://reference
to the image file. When you save the document anywhere in the site, Dreamweaver
converts the reference to a document-relative path.
4. In
the property inspector (window > Properties), set properties for the image.
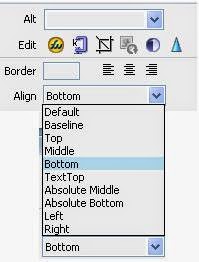
Aligning an image
Use
the image Property inspector to set the alignment of an image in relation to
other elements in the same paragraph or line.
Note: HTML does not
provide a way to wrap text around the contours of an image, as you can with some word processing
applications
Default generally specifies a
baseline alignment. (The default may very depending on the site visitor’s
browser.)
Baseline and Bottom align the
baseline of the text (or other element in the same paragraph) to the bottom of
the selected object.
Top aligns the top of an image to
the top of the tallest item (image or text) in the current line.
Middle aligns the middle of the
image with the baseline of the current line.
TextTop aligns the top of the
image with top to the tallest character in the text line.
Absolute Middle aligns the middle
of the image with the middle of the text in the current line.
Absolute Bottom aligns to the
bottom of the image with the bottom of the line of text (which includes
descanters, as in the letter g).
Left places the selected image on
the left margin, wrapping text around it to the right. If left –aligned text
precedes the object on the line, it generally forces left-aligned objects to
wrap to a new line.
Right places the image on the
right margin, wrapping text around the object to the left. If right-aligned
text precedes the object on the line, it generally forces right-aligned objects
to wrap to a new line.
Image Properties
When the image is selected , the
properties box displays the information about that selected image. Click on
expand button of properties bar to view all of the options.
1.
Top leftmost box contains the image name.
2.
W = Width in pixel or percentage.
3.
H = height in pixel or percentage.
4.
Src = Source of an image; i.e. image location.
5.
Link = Linked page to which the image in linked.
6.
Align = Alignment of an image based on text.
7.
Image Map = Defines hotspots (Rectangular, Circular
& Irregular/polygonal) inside the image.
8.
Vspace/Hspace = Space around the image in pixel or
percentage.
9.
Target = Specifies the location to display a linked
page; specially used for Frame page.
10.
Low src = Linked page with descriptive form.
11.
Boarder = Outer border of the image in pixel.
12.
Alignment = Alignment of the image based on a page.
13.
Alt = Text to be displayed when the mouse pointer moves
over that image.


