Showing posts with label HTML. Show all posts

Saturday, August 15, 2015

How to Change Font Color/Face/Size HTML

Changing the font color, face and size are all relatively simple, and are all contained within the same HTML
function. In order to just change the color, you can do the following:
<FONT COLOR="red">This is the text that the color applies to</FONT>
This is the text that the color applies to
Within the color field you may name a color, as shown, or you may use the HEX code of the color, which is the

preferred method, as seen below:
<FONT COLOR="#FF0000">This is the text that the color applies to</FONT>
This is the text that the color applies to
The color in hex code has a lot more ability and I would recommend that you use it so that you can have a unique
website. The hex code of red then green and blue, all up to 255 but in hexadecimal code. Please note that not all
monitors display all colors.
Changing the face of a font is also very simple and useful. You can change the face of the font to whatever font you
wish, but be careful, if a user does not have that font installed on their computer, then it will just show the default
font. You can change the face by using the following code:
<FONT FACE="Webdings">This is the text that it applies to</FONT>
       
Because people may not have the specific font type that you want it is a good idea to have backup font types
separating them by commas, as seen here:
<FONT FACE="BobsFont,Wingdings,Times New Roman,Times,Courier New">This is the text that it applies
to</FONT>
       
You can change the font size using two basic methods. You can do it by using the size attribute, or by using the style
attribute. The code for the size attribute:
<FONT SIZE="5">This is the text that it applies to</FONT>
This is the text that it applies to
Using this method, you can change the font from 1 to 7. I would not recommend this method. You could also make
the font change, compared to what it was right before as can be seen here:
<FONT SIZE="+2">This is the text that it applies to</FONT>
This is the text that it applies to
As you can notice the font size increased by two font sizes from what it was right before. You can go from -7 to +7,
where the -7 decreases the font size by seven and the positive increases it by seven. Another method of changing the
font size it by using the following:
<SMALL>The small text<SMALL>
The small text
<BIG>The big text<BIG>
The big text
The more commonly seen font size can be changed by using the font style attribute. You can use this code for
modifying that:
<FONT STYLE="Font-Size:20px;">This is the text that it applies to</FONT>
This is the text that it applies to
By using this, you can easily modify the font size from 1 and on. this is what most programs and websites use as
their font size.
Bolding/Italicizing/Underlining/Striking
You may also want to bold, italicize, or underline some of you website. It is very good for making things stand out.
You can bold something using the following code:
<B>This is the text that it applies to</B>
This is the text that it applies to Or you may bold by doing the following:
<STRONG>This is the text that it applies to</STRONG>
This is the text that it applies to
Or you may italicize using the following:
<I>This is the text that it applies to</I>
This is the text that it applies to
And another way to italicize is:
<EM>This is the text that it applies to</EM>
This is the text that it applies to
Or you may underline using the following:
<U>This is the text that it applies to</U>
This is the text that it applies to
Or you may strikethrough text by using the following:
<STRIKE>This is the text that it applies to</STRIKE>
This is the text that it applies to
Making Links
Links are extremely useful for bringing the user to another page that may be within your website, or may be another
website that you think would be useful to others. You can create a simple link using the following code:
<A HREF="tutorials.php">This is the text that it applies to</A>
This is the text that it applies to
There are several different types of links, for local pages, you would use something like the above. For links to other
sites, you may use something like the following:
<A HREF="http://www.onlinecomputerinstitute.com/12/2013/12/html">This is the text that it applies to</A>
This is the text that it applies to There are many different things that you can do besides just simple links, but this is still very useful.
+

What is HTML Tag ?

                        HTML Tags
What are HTML tags?
􀂃 HTML tags are used to mark-up HTML elements
􀂃 HTML tags are surrounded by the two characters < and >
􀂃 The surrounding characters are called angle brackets
􀂃 HTML tags normally come in pairs like <b> and </b>
􀂃 The first tag in a pair is the start tag, the second tag is the end tag
􀂃 The text between the start and end tags is the element content
􀂃 HTML tags are not case sensitive, <b> means the same as <B>


Logical vs. Physical Tags
In HTML there are both logical tags and physical tags. Logical tags are designed to describe (to the browser) the enclosed text's meaning. An example of a logical tag is the <strong> </strong> tag. By placing text in between these tags you are telling the browser that the text has some greater importance. By default all browsers make the text appear bold when in between the <strong> and </strong> tags.
Physical tags on the other hand provide specific instructions on how to display the text they enclose. Examples of physical tags include:
􀂃 <b>: Makes the text bold.
􀂃 <big>: Makes the text usually one size bigger than what's around it.
􀂃 <i>: Makes text italic.

Physical tags were invented to add style to HTML pages because style sheets were not around, though the original intention of HTML was to not have physical tags. Rather than use physical tags to style your HTML pages, you should use style sheets.
HTML Elements
Remember the HTML example from the previous page:
<html>
<head>
<title>My First Webpage</title>
</head>
<body>
This is my first homepage. <b>This text is bold</b>
</body>
</html>
This is an HTML element:
<b>This text is bold</b>
The HTML element begins with a start tag: <b>
The content of the HTML element is: This text is bold
The HTML element ends with an end tag: </b>
The purpose of the <b> tag is to define an HTML element that should be displayed as bold.
This is also an HTML element:
<body>
This is my first homepage. <b>This text is bold</b>
</body>
This HTML element starts with the start tag <body>, and ends with the end tag </body>. The purpose of the <body> tag is to define the HTML element that contains the body of the HTML document.
Nested Tags
You may have noticed in the example above, the <body> tag also contains other tags, like the <b> tab. When you enclose an element in with multiple tags, the last tag opened should be the first tag closed. For example:
<p><b><em>This is NOT the proper way to close nested tags.</p></em></b>
<p><b><em>This is the proper way to close nested tags. </em></b></p>
Note: It doesn't matter which tag is first, but they must be closed in the proper order.
Why Use Lowercase Tags?
You may notice we've used lowercase tags even though I said that HTML tags are not case sensitive. <B> means the same as <b>. The World Wide Web Consortium (W3C), the group responsible for developing web standards, recommends lowercase tags in their HTML 4 recommendation, and XHTML (the next generation HTML) requires lowercase tags.
Tag Attributes
Tags can have attributes. Attributes can provide additional information about the HTML elements on your page. The <tag> tells the browser to do something, while the attribute tells the browser how to do it. For instance, if we add the bgcolor attribute, we can tell the browser that the background color of your page should be blue, like this: <body bgcolor="blue">.

This tag defines an HTML table: <table>. With an added border attribute, you can tell the browser that the table should have no borders: <table border="0">. Attributes always come in name/value pairs like this: name="value". Attributes are always added to the start tag of an HTML element and the value is surrounded by quotes.
Quote Styles, "red" or 'red'?
Attribute values should always be enclosed in quotes. Double style quotes are the most common, but single style quotes are also allowed. In some rare situations, like when the attribute value itself contains quotes, it is necessary to use single quotes:
name='George "machine Gun" Kelly'
Note: Some tags we will discuss are deprecated, meaning the World Wide Web Consortium (W3C) the governing body that sets HTML, XML, CSS, and other technical standards decided those tags and attributes are marked for deletion in future versions of HTML and XHTML. Browsers should continue to support deprecated tags and attributes, but eventually these tags are likely to become obsolete and so future support cannot be guaranteed.

For a complete list of tags, visit W3C.org. 
+

How to upload image and get URL

How to upload image and get the URL of image ? Yes! it is realy true and we can host image with supported of free image hosting site as like www.picasa.google.com, photobucket.com. flicker.com. many more hosted site have on internet but now i'm going to talking about and own of google picasa image hosting site.
so please go from below link to to picasa site

Visit picasa website

1. When you visited picasa site then you will see "Upload Photos" so click an that option

2. And Drag photo here choose image from computer and select when you'll selected

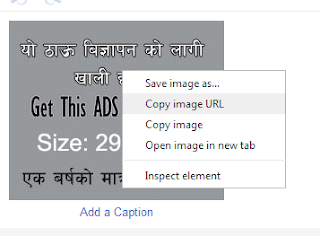
3. Now click on image and view ful size and press right click Button on mouse and give "Copy image URL"

Then paste that is URL whatever you want <img src='Your Image URL here'/> Thank you.
+

Sunday, August 2, 2015

How To Attach Stylesheet in HTML

Hello my friends if you are try to learn HTML and CSS but you don't know how to attach stylesheet in html but also there are many ways to link style sheets to HTML, each carrying its own advantages and disadvantages. New HTML elements and attributes have been introduced to allow easy incorporation of style sheets into HTML documents so please follow the bellow steps.

1. see the feagure of attached stylesheet

Your code is must be look like above the image
so if you want to attach stylesheet please goin to the below of the <title>your site name</title>
section
and type or copy the below code and paste after the </title> tag.
<link rel="stylesheet" href="css/style.css">
Note: change value of css and style what is desired name in to the folder
The CSS is folder name and style.css is stylesheet name
so please make sure it what is have inside of your system folder
+

Sunday, December 28, 2014

How to work with HTML style in Macromedia Dreamweaver?


            HTML style are he pre-formatted (pre-defined) styles, which are used to format contents of a page (normally texts; headings; body text etc.) more easily and quickly. An new style can also be created as well as can also be edited existing formats.

Creating an HTML style

            You can create styles in two ways; you can format the text in the document and then create a style based on the selected text or you can create a style in the HTML Styles  panel by selecting the formatting attributes you want to apply.

To create a new HTML style:
1.                  In the HTML panel, click the New Style icon; you can also choose Text > HTML Style > New  Style. The Define HTML Style dialog box appears.
2.                  In the Name text box, enter a name for the style.
3.                  Under Apply To, choose how this style will be applied by doing one of the following:
To set a selection style, choose selection.
To set a paragraph style, choose Paragraph.
        Note: A paragraph style applies to the entire text block in which the insertion point
                  is located, regardless of what text is actually selected.
4.                  For when Applying, choose whether to apply the HTML style in addition to the existing style of the selected text or paragraph, or to clear the formatting of the selection or paragraph and apply the new HTML style.
5.                  Under Font Attributes, use the pop-up menus to select the formatting options you want to apply.
6.                  If you are creating a paragraph style, under Paragraph Attributes, in the Format pop-up menu, choose a paragraph tag (for example, paragraph, Heading1, Preformatted).
7.                  For Alignment, click the left, center, or right alignment button to set the paragraph alignment you want.
8.                  Click OK.

Applying an HTML style
      Applying a style is as selecting the text or paragraph you want the style applied to , and then selecting the style in the HTML styles panel.
1        In the lower left corner of the HTML Styles panel make sure the apply option is selected to automatically apply the style you select.
2        In the Document window do one of the following to select the text you want the style applied to:
Place the inserting point anywhere in a paragraph to apply a paragraph style.
Use the cursor to select the text you want a selection style applied to.
3.      In the HTML Styles panel, click the HTML Style you want to apply to the text.
The text automatically updates in the Document window.

Editing an HTML Style
            When you edit and HTML Style, Dreamweaver does not automatically update text that was previously formatted using the HTML Style. To update the style to previously formatted text, you must manually re-apply the style.

To edit an existing HTML style:
1.                  Make sure no text is selected in the Document window.
2.                  In the HTML Style panel, make sure the Auto Apply checkbox is deselected.
If the Auto Apply option is turned on, the HTML style will be applied when you select it in the HTML Style panel.
3.                  In the HTML styles panel, do one of the following:
Right-click the style, then choose Edit from the context menu.
The Define HTML Style dialog box appears.
4.                  In the dialog box, set style attribute options for the style.
5.                  To reset it to the default options click clear.

About the Quick Tag Editor
            The quick Tag editor has three modes:
·                    Insert HTML mode to insert new HTML CODE.
·                    Edit Tag mode to edit an existing tag.
·                    Wrap Tag mode to wrap a new tag around the current selection.
The mode in which the Quick Tag Editor opens depends on the current selection in Design view. In all there modes, the basic procedure for using the Quick Tag Editor is the same:  open the editor, enter or edit tags and attributes, and then close the editor.
      You can cycle through the various modes by pressing Control+T while the Quick Tag Editor is active.
      If you use any invalid HTML in the Quick Tag Editor, Dreamweaver attempts to correct it for you by inserting closing quotation marks and closing angle brackets where needed.

Inserting an HTML tag with the Quick Tag Editor
      You can use the Quick Tag Editor to insert an HTML tag in your document.
  1. In Design view, click in the page to place the inserting point where you want ot insert code.
  2. Press Control+T.
The Quick Tag Editor opens in Insert HTML mode.
  1. Enter the HTML tag and press Enter.
The tag is inserted into your code.
       4.   Press Escape to exit without making any changes.


+

Steps for creating Webpage using HTML?

1.     First make one folder inside the desired location.
2.     Write the source file with all required items (text, Images, table..) by using HTML codes using anyone           Text Editor like notepad.
3.     Save the source file suing .html or .htm extension inside the pre-made folder. Don't forget to choose All         files from the drop down menu of save as type.
4.     Save all images, sound clips and other items used in the web page inside the same location.
5.     Open any one available Browser (like Internet Explorer, Netscape Navigator etc.)
6.     Set path at address bar, otherwise direct choose the source file by using file Open option.

Note 1: If you change or modify a source file, don't forget to save and then refresh the browser to get the final output.
Note 2: Tags are not case sensitive. You can use both upper and lower case for tags. But, attribute valuse may be case sensitive. for ex: "Cloud.gir" is not same as "Cloud.gif"

Structure of HTML Program:
<HTML>
<HEAD><TITLE>.....</TITLE></HEAD>
<BODY>
.......................
.......................
</BODY>
</HTML>
All the contents of HTML documents must contained between <HTML> and</HTML> tags <HTML section>

+