Showing posts with label Windows XP. Show all posts

Saturday, August 15, 2015

How to remove software operating system

When run application on your computer downloaded files from internet site for Example: Adobe photoshop, Yahoo messanger, Google talk, Antivirus etc like that software is called third party software and sometime no need to you some software on your windows but don't know how to Completes throw that software from windows so look at down some tricks for your problems...


1. First Click on "Start" Button and get "Control Panel" From showing of Start menu

2. And Click on "Programs and features" but if you are using a Windows XP you will see there "Add or Remove" when you are click that options after automatically will open another windows

3. So Scroll the mouse and find there which software is you want to remove from computer then select her after found

4. And Click to "Uninstall Button from top of button or press right click on correct software and you will see there name "Uninstall" so after take your continued according of there.
+

Friday, August 14, 2015

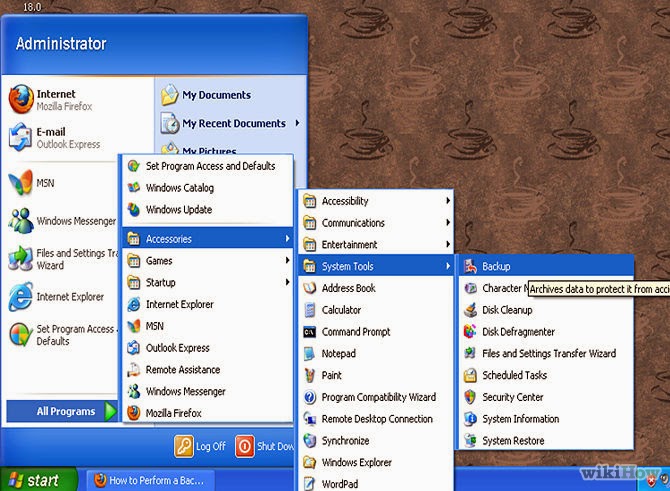
How to back up files and folders in window XP?

Note: You must have administrative rights on your computer to back files and folders.


1.     Click Start point to All Programs, point to Accessories, point to System tools and then click                    backup.
2      After the backup or restore wizard star, click Advanced mode.
   
      Note: If the backup and restore wizard does not start automatically,click Backup wizard on the tools                       menu to back up files

3.     Click the Backup tab.
4. Click New on the Job menu.
5.     Click to select the check boxes next to the drives that yo want to backup.
         If you want to select specific files or folders, expand the drive on which these files or folders are                      located.and then click the check boxes next to the files or folders that you want to back up.
6.      Click to select the System state check box that is located under My computer in the left pane.
7.      In the Backup destination list. click the backup destination that you want to use.
8.      If you clicked file in t previous step, type the fill path and file name to which you want to backup data n          the Backup media or file name box.
9.      Click Start Backup
10.    Under If the media already contains backups perform one of the following steps.
         # If you want to append this backup file to previous backup files. click Append this backup to the                     media..
          #If you want to overwrite previous backup files with this backup file. click Replace the data on the                   media with this backup
11.     Click Advanced.
12.     Click to select the Verify data after backup check box.
13.     In the Backup type box, click the type of backup that you want to create. You can select any of the following backup files.
           #Normal
           #Copy
           # Differential
           #Incremental
           #Daily
           when you click a backup type, a description of that backup type appears under "Description."
14.     Click OK and then click Start Backup.
15.     When the backup is complete click Close.
+

Sunday, August 2, 2015

How To Upgrade SP2 To SP3 in Windows XP Without Formatting Registry Editor

Now days some new softwares and New some games don't run on windows XP Service pack 2 so if you want to change service pack 2 to service pack 3 you can easy in one miniute so  here is the superway to change windows XP service pack 2 to service pack 3 without any installationor formating and nothing to worry about thinking trouble on windows.

1. Open the start menu and click on "Run" or press the "Win Logo+R" Freom the keyboard button and type the "regedit" then press "Ok" and "Yes"

2. From there right sidebar click and find carefully to the "HKEY_LOCAL_MACHINE / System / Controlset001 / Control / Windows"
3. Now double click in the "CSD Version"


4. Now type the value of "300" or "200"inside the "dialog box
Note: The Value of 300 mean "Service pack 3" & The value of 200 mean "Service pack 2"
so type the any value as your desired
After you desired value and press "Ok" button and restart the computer
and system has been changed to different Service pack thank you.
+

Sunday, December 28, 2014

About Basic control in windows XP.


            Most of what you do in Windows XP will be done using a utilities buttons, menus, dialog box or a window. This chapter shows you how you can use these structures.

ñ     Structure of window
All windows are similar in their structure. It is a rectangular frame. As an example we will look at the basic window structure from My Computer window.

Ì    Title Bar
It is located at the top of the window. It contains name of the program, name of file, minimize, maximize, restore and close buttons.

Ì    Maximize
This function allows you to concentrate on on e application by making its window cover the entire screen

Ì    Minimize

This function allows you to keep an application running, but remove it from the desktop area so that other applications can be accessed. The minimized program becomes a bar at the bottom of the screen, and can be accessed by clinking on the bar.

Ì    Resize/Restore
If an application window is not maximized, it can be resized so that more or less contain can be seen. If you move your mouse pointer to one of the edges of the window, it will become a two-way arrow. At


This point, hold down the left mouse button and drag the perimeter of the window in our out. When you release the mouse button, the window will resize to your specifications.

Ì    Close 
This function closes and exits the application you are running. However, if you are running an application such as Microsoft word, the window of each document will have a close button, and clicking this button will only close that particular document, and not the entire program, it is important to always save your work before using the close feature, as any unsaved changes will be lost.

Ì    Menu
Most of the  windows will have a menu bar near the top, displaying the menu options relevant to a particular window. Simply click on a menu option to reveal a drop down list of further options within  it. As a n example, we look at the view menu from My Computer window.


Ì    Dialog Boxes
Simple setting can be made from menu options, other setting need to be made from dialog box. Dialog box appear with Tabs, Check Boxes, Radio buttons and Action buttons etc.

Ì    Tab


                                    Click on the appropriate one to display its setting.

Ì    Check Boxes


Click on as many as required. A trick indicates that the option is active. If you click on it again it will be turn off. If an option is dimmed out, it cannot be selected.

Ì          Radio Buttons


                        Only one out of group of radio buttons can selected. If you click    another radio button, the previously selected one is automatically turned off.

Ì  Action buttons
OK will save the setting selected and close the dialog box or window. Cancel will close the window without saving the amended setting-click on it if you’ve made a


mistake. Apply will save the setting selected so far but will not close the window, in case you want to make further changes.
As an example we will look at the dialog boxes of bolder option from my computer window.

Ì  Tools Bar
       Tool bar contains the short cut icon of the menu bar. It helps to work with the file directly by clicking icon.

Ì  Scroll Bar
     
  If a window is not big enough to display all the information within it, then a scroll bar will appear automatically. Use it to see the contents of a window not immediately in view.
u  Drag the slider along the scroll bar towards one of the two scroll arrows to scroll in that direction.
u  Click on the scroll bar to display the next window’s amount of information towards the scroll arrow arrested to it.
u  Click on one of the scroll arrows to scroll just a little in that direction. Hold down your mouse button to scroll continuously.

Ì  Resize Pointers.
       If window is not maximized of minimized, it can be resize.
u  Place the mouse arrow anywhere on the edge of a window. It will change to a double header resize pointer.

u  Drag the pointer outwards to increase the size of the window or inwards to reduce the size. Release the mouse button when the window is the desired size.
+

About Turn Off computer options.


            When this phrase is clicked, the Shut Down menu will appear, allowing you to hibernate shut down, or Restart the computer. To use this feature, refer to the Start Up and Shut Down portion of Level 1.

·                     Stand by

When a computer is left alone for a while, it goes into “sleep” or “stand by” mode to save energy. In stand by mode, the computer slows down its inner processes because they are not  being used. The computer also blacks out the monitor. If


You wish to use a computer and the monitor is dark, check to see if it is in stand by before you try to start it up. Usually the computer has a green light on or near the power button that signifies that it is on, but in stand by mode. To “wake it up,” move the mouse or hit a key on the keyboard. If you do not realize that the computer is in stand by and you try to turn it on with the power button, the computer will wake up and a dialogue box will appear, but it will not damage the computer.

·                     Turn Off

Click here and Windows XP saves any unsaved work before turning off your computer Most newer – type monitors are also turn off automatically.

·                     Restart
This also saves your work and shuts down your computer, but it starts it up again right way Click on this option after making changes to some of  your windows setting and you want these to take effect, or after installing some programs.

·                     Hibernate
Hibernate only appears on some computers. If you don’t see it initially, hold down the shift key and stand by button is replaced by the hibernate button. Its function is similar to the stand by mode, but it also saves whatever is in memory at the time to your hard disk. So when you turn your PC back on, the memory state is loaded automatically on your desktop and open programs appear just as you left them- you can then simply carry on from the point you left off. The Hibernate mode is not as sage as the turn off option so try and avoid using it

    Switch User
Click here if someone else wants to use your computer for few minutes. The welcome screen is displayed, from where you can log on a new user.

·                     Steps to Log Off/Switch User on your Computer
Ì    Click on Start Button.
Ì    Click on Log Off option


ÌClick on Switch User/Log Off button.


+

About task bar properties in windows XP

Taskbar Properties

It is used to change the task bar appearance and notification area
u  Right click on taskbar properties.
u  Click on Properties.

Note: Check and unchecked to change the properties lock the taskbar.
            It locks the taskbar if checked

Auto hide the taskbar
            Auto hid the taskbar if it is hot  required if checked.

Show quick launch
            Shows the quick launch bar on task bar if checked.

Show the Clock
            Shows the clock icon on taskbar, if checked.

Hide inactive icons
            Hide the inactive icons of taskbar if checked.


Then the taskbar properties dialog box will appear.
u  Click on Apply.

u  Click on OK.
+

Terms used in Windows XP.

·                     The Desktop

The background area of the computer screen is called the desktop. It is the main interface to computer. The desktop is your work surface. It is the screen you see once your computer has finished booting up and you are ready to get started.


·                     Taskbar
       The taskbar appear at the bottom of the windows desktop; it lets you launch and manage                        programs.

·                     The Start Button
The start button is located on the taskbar. From Start Button you can do almost everything: Start Programs, Access your files, shutdown computer and much more.

·                     Icon
The small pictures are shorcuts to programs called icons. Small pictures that represent command and programs in windows. You can launch programs by double click icons to start a program.

·                     Wall Paper
The image on your desktop is called Wallpaper or Desktop Background.
      The Desktop

·                     My Computer
You can use my computer icon to locate files, folder and hard disk or CD drive, zip drive or control panel, mapped drive or other computer connected to the network.

·                     My Documents
      My document is desktop folder that provide you with a convenient place to store documents,                 graphics or other files you want to access quickly. If you save any file in Ms. Paint or Ms. Word             program automatically saved in my documents unless you choose different location.

·                     My Network places
      A network is collection of interconnected two or more computers. It helps to share, copy, move,            delete, edit, print etc from one computer to another staying on one computer.

·                     Internet Explorer                     

It helps to starts the deleted files on your hard disk. You can restore and emptize from recycle bin.
+

Most reliable method to search application program.

Most Reliable method to search application programs:
  1. Click on Start button.
  2. Choose search
  3. Choose for Files and Folders and click on it; again click on All files or Folders option in case of Windows ‘XP.
Then the following dialog box will appear.


  1. Type any above required application file name at the search for files or folders (All or part of the file name) box.
  2. Select My computer or Local Hard Drives from the look in dropdown menu.
  3. Click on Search now (Search) button.
Then, the icon of the selected program will display
  1. Give double click on it.
Then you will directly enter into the program.
Note: You can also run the applications by using its application file name. Start-Run-type  application file name and click on ok.

Wild Card:
            You can use the following character at the time of searching any types of unknown item inside the computer.
1.                  Question mark (?) – It represents single unknown characters.
2.                  Asterisk or Star mark (*) – It represents group of unknown characters.


+

How to start a computer in Ms. Windows mode?


            There is nothing special you need to start this system. Just,

1.      Switch ON the Power Supply.
2.      Switch ON the CPU and,
3.      Switch ON the screen (Monitor).
Then, wait for sometime, you will directly enter into the windows Environment (i.e. Desktop) and see the following window. With the help of this Environment, you can perform any types of work related to the computer.


+

Starting system of computer.


               We know that a computer is simply a machine which works under the control of a set of instructions called program. For a computer to be ready to work, all its peripherals should be checked and activated, and the relationship between hardware and software needs to be established. For this purpose, a special type of software is used, which is called as an Operating System.
            Starting process of computer varies from one operating system to another. There are different processor to enter into the programs. It depends upon the operating system installed into the computer. So, you have to know about operating system of computer before running the programs.
            There are mainly two types of Operating system used in the computer:
1.      Ms. Dos (Microsoft Disk Operating System)
2.      Ms. Windows (Microsoft Windows 3.11, ’95, ’98, ‘Me, ’00, ‘XP..)
However, the inner process of starting your computer is same, which is called Booting.

Booting:
            The process of loading the system files of the operating system from the disk into the computer memory to complete the circuitry requirement of the computer system is called booting. The system files of MS. DOS are:
·         IO.SYS: It checks all the input and output devices and their activities and make them ready
·         MS. DOS.SYS: It builds the relation between the hardware and the application software-acting as interface.
·         COMMAND.COM: It helps to make the instructions given to the computer using the different programs executable.
IOS.SYS AND MSDOS.SYS are hidden files but COMMAND.COM is visible.

Types of Booting:
There are two types of booting:

·         Cold Booting: If the computer is in off state and we boot the computer by pressing the power switch ‘ON’ from the CPU box then it is called as cold booting.
·         Warm Booting: It the computer is already ‘ON’ and we restart it by pressing the ‘RESET’ button from the CPU box or CTRL, ALT and  DEL key simultaneously from the keyboard then it is called warm booting.


+